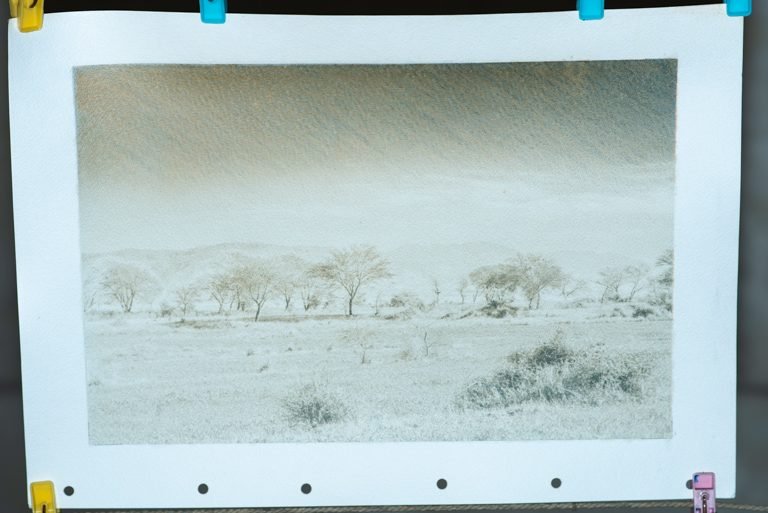
I shall discuss the art of making a monotone gum bichromate print over a cyano type using burnt sienna water color in this article.
I shall use the first coat of cyano type and then four layers of gum bichromate on this picture.
The camera calibration and the white balance
A suitable photograph for the making of a gum bichromate is the one in which you have an easier “control”. An Image which shall help later to make a good gum bichromate print.
An adequate practice is to do a perfect custom white balance.
I usually use an expodisk, however, any other standard white balancing tool is suitable.
Also, it is important to have a better metering as well for an excellent exposure. This shall give a long tonal scale in the “Negative”.
Similarly, if possible, the use of color charts will give a perfect color calibration.
It is an important step for making a desired digital negative, which can produce a nice looking handmade gum bichromate print.

The original scene
I picked a very flat subjective scene. There is not dramatic lighting in it.
It is only a demonstration about a gum bichromate which is printed in this kind of lighting as well.
The original picture is below. The gum print shall be in the monotone.

The Preparation
Creating an ICC profile gives a simulation on the screen for the color gum bichromate print . So that in the software like Adobe Lightroom or Adobe Photoshop, the edit is according to the custom proof.
If you are making ICC profiles the advantage is that, it also saves time from making the curves.
For Black and White and monotone, a curve is enough. For the color GUM BICHROMATE an ICC profile is important in my experience.
However, a “monitor calibration” is extremely crucial. So most of the time I do use the simulation.
an excellent achievement is to :-
“Make a good negative with a full tonal scale, for a good print “.

Preparation of the negative is easier in Adobe Lightroom. However I do separation of the Negative in Adobe Photoshop.
Use gloves , mask and goggles for protection.
The watercolor paper needs sizing and then stretching.
The Sizing of the paper before printing will help in making smooth images.
Because of a good sizing., the pigment does not sink into the paper.
Gelatin tub sizing is the best and many of the watercolor master artists recommend it.
Paper stretching keeps the paper straight and is helpful in registering better with the negative.
I usually outline the negative to print the image in the center and give borders to all four sides.
The Digital Negative
I have tremendous respect for the wet and dry plate collodion negative makers and the silver based film users.
However my personal approach is that living in the today’s digital world, one can not ignore its capabilities .
The ability of making curves, profiles, simulations and masking gives an immense control over the color gum bichromate process .
My Negatives are inkjet. After the editing I use screen film for printing.

Sizing details
Preferably, gelatin sizing with a 2.5% solution is enough. I use the formaldehyde bath for hardening. This is after the gelatin bath dries. This prevents an image from sinking in the fibers.
*Precaution!!!
Use Goggles, gloves and mask while handling Chemicals.
Formaldehyde is extremely pungent and dangerous for eyes, use of goggles is must.

Paper Stretching
Before any of the coating, stretching the paper is a good practice. It keeps the registration perfect and the paper straight.

Marking and Outlining
I like to have borders on all four sides.
One of the side, however, will have punch holes for the registration pins.

Cyano type as the first coat
A common aspect of both the cyano type and the gum bichromate is that they develop in water.
Although most of the print makers around the world coat in subdued light.
My choice is still to coat and dry the paper in a dim red light. In this way, I can avoid even a very slight fog.
Using the pin registration is an easier option . But there are several more registration methods..
Multiple coatings are nicer. So good registration will intact the sharpness.
And my UV light source is the home made burner shown in the picture.
The Cyano type as a base coat has many advantages, both in color and in monotone gum prints.
It is crisp, and tonality is maneuverable while developing.
Later, the softer gum over the cyano type blends very well and gives a very pleasing look to the print.
Water temperature
Consistent results require good measurement practices. When the weather change, the behavior of the development is also different. I prefer 22-24 degree Celsius in all seasons.

The Cyanotype
The red light reminds me of the old black and white days. I prefer a synthetic and a goat’s hair brushes.

Contact print
After the emulsion is dry. I attached the negative and the watercolor paper with the registration pins for the contact print.

The UV light source
This is my home made UV light source.

Developing the cyanotype
I use three dishes.
The developing is by paper face down in the water.
The total developing time is normally thirty minutes. Ten minutes in each dish.
The Development
This is the aqueous development.

First dish
The first developing is extremely sensitive and important, as the bubbles between the paper and the water surface can cause stain and ruin the print.

The second dish
Although the water pulls out most of the dichromate in the first dish. However, the second dish cleans the image, and the development continues for the third dish.

Last dish
At the end, the third and last dish is complete. Now the print feels stable.
 3rd dish
Cyano type printed

The Gum Bichromate over the Cyano type
The gum’s bichromate mixed with the burnt sienna pigment and the potassium dichromate solution is now turning the bluish cyano-type image into grayish color.

The 3rd emulsion
Now the third emulsion makes a warmer tone of brownish.

The 4rth coat
The fourth coat makes the brown tone, more orangish

The last coat
Finally, the fifth emulsion is there, the density remains neutral, however a bath of potassium metabisulfite will clear the orange, which is because of the dichromate.

The Clearing Bath
The metabisulfite bath extinguishes the orange color .
After this thorough washing cleans the metabisulfite..
So it is a handmade print, it is important that small spots are to be retouched by the brush.

 In the frame
Mounted and framed
A hand made gum bichromate print ready for display.
